Setting up a simple Scala.js project
In this post I will guide you through the steps to start a basic Scala.js project. As a base we will use the Scala.js example application provided by Sébastien Doeraene (Scala.js’ creator and lead developer).
Let’s say you want to have a Scala.js project called “My Project” (note the space between the words).
Step 1: Clone the exaple application
The example application can be found here: https://github.com/sjrd/scala-js-example-app
You would use your favourite git-client to achieve this. Either through an UI-tool, or the command line:
git clone https://github.com/sjrd/scala-js-example-app.git
Step 2: Rename folder
Cloning will have produced a folder caled “scala-js-example-app”.
Rename it to “my-project”.
Step 3: Modify build.sbt
Apply the following changes to the build.sbt file:
- Change the name of the project to “My Project”
- Optionally change the Scala version
- Optionally add the jQuery-wrapper dependency
My build.sbt looks like this:
// Turn this project into a Scala.js project by importing these settings
scalaJSSettings

name := "My Project"

scalaVersion := "2.10.4"

ScalaJSKeys.persistLauncher := true

ScalaJSKeys.persistLauncher in Test := false

libraryDependencies ++= Seq(
    "org.scala-lang.modules.scalajs" %%% "scalajs-dom" % "0.6",
    "org.scala-lang.modules.scalajs" %%% "scalajs-jquery" % "0.6",
    "org.scala-lang.modules.scalajs" %% "scalajs-jasmine-test-framework" % scalaJSVersion % "test"
)
Step 4: Generate and Import Project
At this point I tend to generate an IDE project, that I can import and work with. It makes things like changing packages, renaming classes, etc. easier.
In my case, because I use Eclipse (Scala-IDE), within SBT I type:
sbt> eclipse with-source=true
IntelliJ-IDEA users would type:
sbt> gen-idea
This pre-supposes that the plugins are accordingly configured in your system. Refer to the official documentation:
- Eclipse: https://github.com/typesafehub/sbteclipse
- IntelliJ: https://github.com/mpeltonen/sbt-idea
Step 5: Change the Main Class
Once the project is imported in the IDE, proceed to change:
- The package of the main class
- The name of the main class
- Optionally, include the jQuery package
- Optionally, write some demo code using jQuery
The resulting main class would look something like this:
package com.sebnozzi

import scala.scalajs.js
import js.annotation.JSExport
import org.scalajs.dom
import org.scalajs.jquery._

object MyProject extends js.JSApp {
  def main(): Unit = {
    jQuery("body").append("<h1>Hello from Scala.js using jQuery</h1>")
  }
}
The IDE should have taken care of generating the corresponding folders.
Step 6: Change the HTML files
We can now begin generating the Scala.js code.
In the SBT console, run:
sbt> ~fastOptJS
This will activate the continuous compilation and give us valuable information for fine-tuning the HTML files. You should see some output like:
[info] Fast optimizing /home/sen/temp/my-project/target/scala-2.10/my-project-fastopt.js
This will tell you the location (note the Scala version!) and the name of the generated JavaScript file. Especially important is it when you use spaces in the project name, as we did.
Armed with this information, modify the HTML files accordingly:
- Change the title of the host page
- Optionally include the jQuery library
- Optionally add other JavaScript dependencies
- Remove the default HTML
- Modify the URLs to the generated Scala.js files
The file index-fastopt.html would look like this:
<!DOCTYPE html>
<html>
<head>
  <title>My Project</title>
  <meta http-equiv="Content-Type" content="text/html; charset=UTF-8"/>
  <script src="http://ajax.googleapis.com/ajax/libs/jquery/1.11.1/jquery.min.js"></script>
    <!-- Add other JavaScript libraries here -->
</head>
<body>

<script type="text/javascript" src="./target/scala-2.10/my-project-fastopt.js"></script>
<script type="text/javascript" src="./target/scala-2.10/my-project-launcher.js"></script>

</body>
</html>
The file index.html would look almost the same, the only difference being the “opt” suffix at this line:
<script type="text/javascript" src="./target/scala-2.10/my-project-opt.js"></script>
Note that the “launcher” line remains the same.
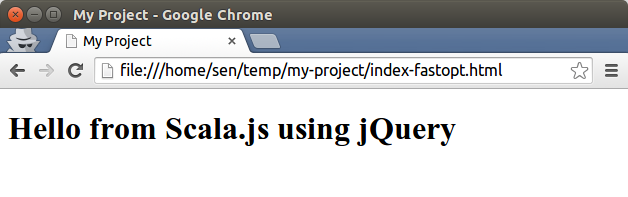
Step 7: Verify
If all of the above steps were done correctly, upon loading index-fastopt.htmt you should see:
Summary
The best way to get started with a simple Scala.js project is:
- Clone the skeleton application
- Rename the folder
- Change the SBT configuration
- Change the main class
- Change the HTML files
- Include extra libraries
I hope this has been helpful. Let me know what you think and ask questions if anything is not clear.